Mastering Essential Knot Techniques: Whipping and Fusing Your Rope

Hey Scouters, are you ready to take your knot-tying skills to the next level? Today, I'm excited to share with you two essential techniques that will keep your ropes secure and ready for action: whipping and fusing. So, let's dive right in and explore these invaluable skills together!
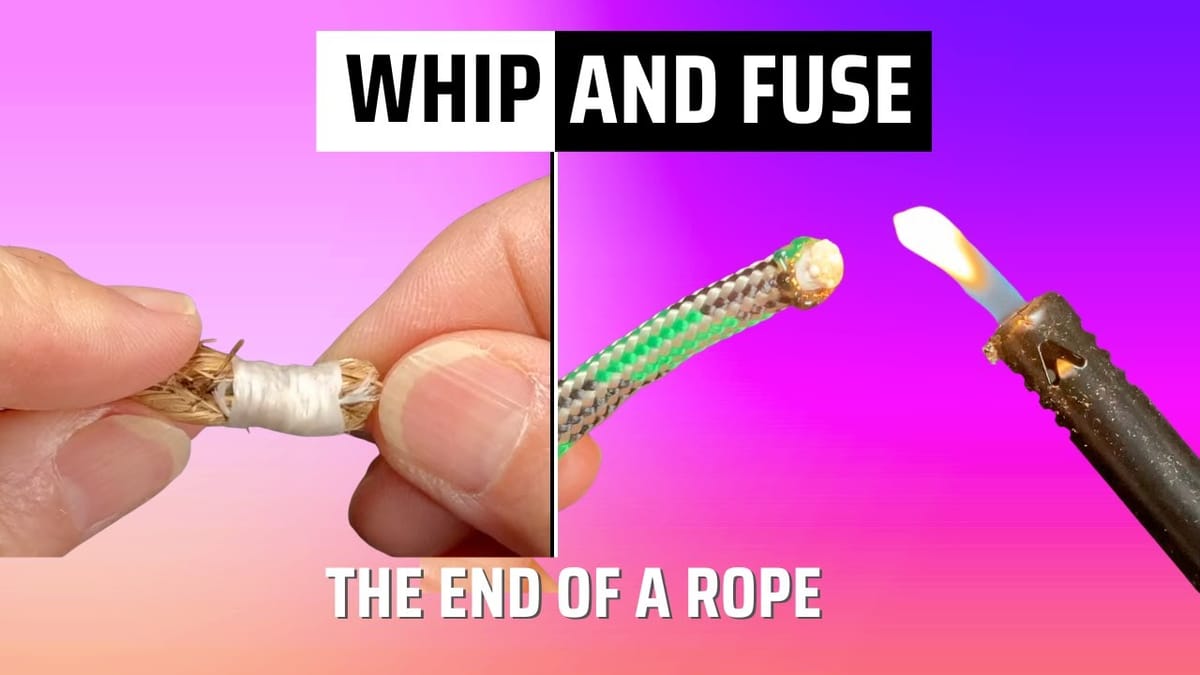
Whipping: Keeping Your Rope Secure
Imagine this: you're out in the wild, relying on your trusty rope for various tasks when suddenly, it starts to unravel. Sounds like a nightmare, right? Well, fear not, because whipping is here to save the day!
Whipping is a simple yet effective method for securing the ends of your rope, preventing it from fraying and unraveling over time. Here's how it's done:
- Prep Your Materials: Gather your rope and whipping material—typically dental floss or waxed thread. Make sure your rope is clean and free from any dirt or debris.
- Create a Loop: Take your whipping material and make a small loop at one end. This loop will serve as the starting point for your whipping.
- Wrap the Rope: Begin wrapping your whipping material tightly around the end of the rope, covering about half an inch to an inch of the rope's length. Keep the wraps close together for maximum security.
- Secure the Ends: Once you've wrapped the desired length, thread the loose end of your whipping material through the loop you created at the beginning. Pull tight to secure the end and hide it underneath the wraps.
- Trim the Excess: Finally, trim any excess whipping material to tidy up the ends and ensure a neat finish. Congratulations, you've successfully whipped your rope!
Whipping is particularly useful for ropes prone to unraveling, such as manila ropes used for lashings. By taking the time to whip your rope, you'll ensure its longevity and reliability in any outdoor adventure.
Fusing: Creating a Permanent Bond
Now, let's turn our attention to fusing—a technique that creates a permanent bond between the ends of your rope, eliminating the risk of unraveling altogether. While fusing requires a bit of caution and precision, the results are well worth the effort.
Here's how to fuse your rope effectively:
- Measure and Mark: Determine the desired length for your fused section and mark it with painter's tape. This will help guide your fusing process and ensure a clean finish.
- Protect the Ends: To prevent the ends of your rope from unraveling during the fusing process, wrap them with painter's tape. This simple yet effective step will save you from headaches down the line.
- Apply Heat: Using a heat source, such as a lighter or torch, carefully apply heat to the marked section of your rope. Focus the heat on the white nylon fibers within the rope, as these will melt and fuse to form a strong bond.
- Check for Melting: Keep a close eye on the rope as you apply heat, ensuring that the nylon fibers begin to melt and fuse. Once you see the fibers melding, you'll know the fusion process is underway.
- Trim Excess: Once the fusion is complete, allow the rope to cool briefly before removing the painter's tape. Then, trim any excess fused material for a clean and professional finish.
By mastering the art of fusing, you'll create ropes that are not only secure but also durable enough to withstand the rigors of outdoor adventures.
In Conclusion
Whipping and fusing are two essential techniques every Scout should have in their repertoire. Whether you're securing the ends of a rope or creating a permanent bond, these skills will serve you well in any outdoor setting. So, the next time you embark on a wilderness adventure, remember to whip and fuse your ropes for maximum reliability and peace of mind.
And there you have it, Scouters—two invaluable knot-tying techniques to add to your arsenal. With a bit of practice and patience, you'll become a master of whipping and fusing in no time. Happy knot-tying, and may your ropes always stay secure on your adventures!
Don't forget to click the link and test your skills with "Beat the Clock" after mastering all seven knots required to reach First Class.
"Beat the Clock" https://youtu.be/VW5wep9hKKY
"Become a knot-tying pro on your journey to First Class" https://youtu.be/PmZKG1bnXtE